Váš košík je prázdný


Homemade low-fat and skim milk yogurt recipe


With tips to make it extra creamy.
There are so many kinds of milk on store shelves these days that it’s hard to know which one to choose. The primary types are differentiated by the percentage of fat. As a guide whole milk has approx. 3.5% milk fat, reduced-fat (2% milk fat), low-fat milk (1%) and finally fat-free milk, which is also known as skim milk.
Prior to the 1960’s when reduced fat milk was popularised, yogurt was only made from whole milk. The fat in whole milk naturally helps thicken the yogurt. Yogurt made with reduced fat milk or skim milk is thinner. For this reason, commercially made, low-fat yogurts include additives and stabilisers to improve the texture. The beauty of making yogurt at home is that you can control what goes in and avoid additives altogether. With a few extra simple steps in the method, it’s possible to achieve homemade, thick and creamy, reduced-fat yogurt. Choose one (or two) of the following steps.

1. HEAT THE MILK FOR LONGER
With most of the fat removed, skim milk ends up with a larger percentage of the milk protein, casein then regular whole milk. When heated these proteins denature, coagulate and thicken. Heating the milk for an extended period will naturally help thicken the yogurt.
When preparing the milk, gently heat it to 160º-180°F, (71°-82°C) and maintain the temperature for 15 to 30 minutes. To ensure a continuous, pre-boil temperature, use a wok ring to create a distance between the flame and pot, or a double boiler pot with boiling water. This method is explained below.
2. ADD SKIM MILK POWDER
An extra boost of skim milk powder can also be added to the milk to increase the proteins in the milk. As a guide add 1/3 cup of dry skim milk powder to every litre of milk. We also recommend heating and holding the milk at 160º-180°F, (71°-82°C) for 10-20 minutes.
3. STRAIN THE YOGURT
The straining process removes the water content (whey) from the yogurt, so you are left with a thicker composition similar to Greek style yogurt. The longer you drain away the whey, the thicker your yogurt will become. Removing all the whey will result in a yogurt cream cheese.

WATCH HOW HERE
PREPARATION
Before you begin it is important to sterilise the glass jar, lid and any utensils you use, in boiling hot water. The danger of not sterilising is that other bacteria may overpower your culture and affect the quality of your yogurt.
INGREDIENTS
Reduced fat or skim milk (up to 2 litres)
Yogurt starter culture
1/3 cup of dry skim milk powder per litre of milk (optional)
METHOD
1. Select two large saucepans that can sit into one another in a double boiler fashion.
2. Pour up to 2 litres of fat-reduced milk into the smaller of the two saucepans.
3. (Optional step) Add skim milk powder - Measure out 1/3 cup of skim milk powder per litre of milk and whisk it into the saucepan of milk. The skim milk powder will sit on the surface of the milk and form clumps. Do not worry. Once heated the dry milk solids will dissolve and incorporate.

4. Heat the milk to 180°F / 82°C. Stir the milk with a wire whisk as it heats so that the milk powder doesn’t settle and burn at the bottom of the saucepan.
5. Fill the larger saucepan with approx. 2 inches of boiling water.
6. Once the milk has reached 180°F / 82°C place the saucepan of milk into the pot of boiling water and hold it between 160º-180°F, (71°-82°C) for 20-30 minute.
7. Remove the saucepan of hot milk from the stove-top and leave to cool to below 110° F (43° C). Note, the milk can cool down to below 43°C, it just mustn't be too hot when adding yogurt starter culture. Temperatures above 43° C will kill the bacteria in the starter culture.
8. Pour the milk into the yogurt making glass jar.
9. Add the starter culture and gently whisk it in. Each starter culture will come with different instructions. Please use the amount specified.
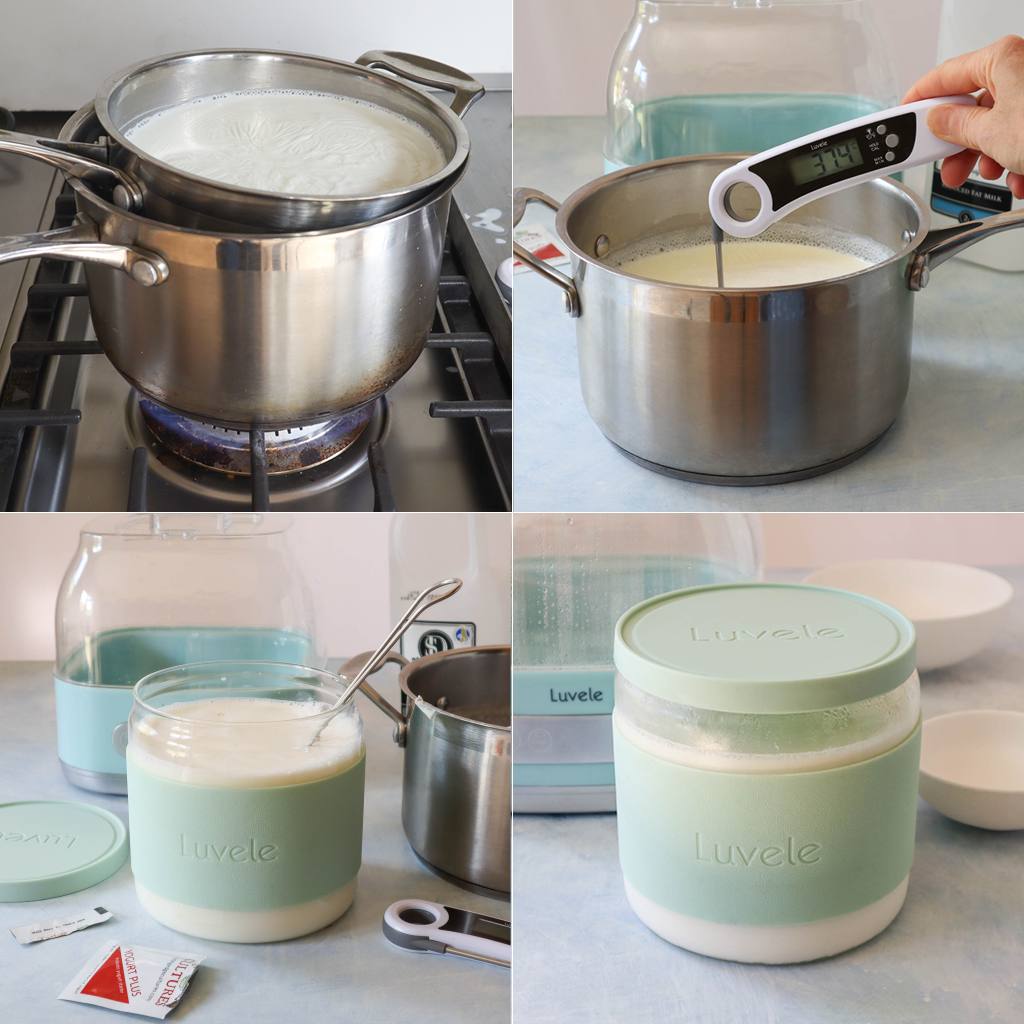
10. Put the lid on the glass jar and place into your yogurt maker. Pour water slowly into the base. The water must not be filled over the ‘tall line’ indicated on the inside wall of the maker. Place the cover lid on top. Use the digital control panel to set the temperature to 38° C (100° F), the time to 24-hours and then press ‘confirm’ to begin incubation.
11. After 24 hours the fermentation is complete. Switch the yogurt maker off. Condensation will have collected under the cover lid. Take care removing it and allow the water to drip into the water bath, instead of your bench!
12. Remove the yogurt jar from the water bath. Straight from the maker the yogurt will be runny and warm. Place the jar in the fridge for at least 6 hours to chill and set.
13. (Optional step) Strain the yogurt for 1-2 hours to remove some of the liquid whey.
PIN THIS RECIPE


Item is added to cart